| Using HomeSite |
|
|
Chapter 1 Configuring Browsers and Servers |
|
| Using HomeSite |
|
|
Chapter 1 Configuring Browsers and Servers |
|
The following sections describe the choices available for browsing documents and processing pages from within HomeSite.
You can use the internal browser to view documents in a Web browser within the program. Open the Options > Settings > Browse pane to set options.
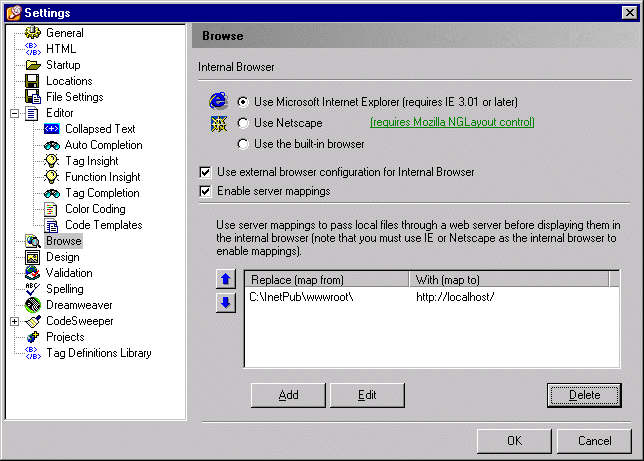
You can select from these browser options:
Go to http://www.microsoft.com/downloads/ to get the latest version.
Go to http://www.mozilla.org/ to download the latest version. See the Installing Mozilla section for setup instructions.
Be aware that the built-in browser is limited in its support of HTML and browser extensions.
Only one internal browser may be used at a time, but you can change this setting as needed. Restart the program to effect the change.
| Installing Mozilla |
If your Mozilla bin directory does not contain a file named component.reg or if that file is smaller than 5KB, then delete it and run mozilla.exe. This generates a new component.reg file. This file is the database XPCOM uses to create new objects, without it the Mozilla control will not be able to create Gecko components and will not work.
If regsvr32.exe is not in you path use the Windows Find Files utility to locate it and run it using the full path.
The control will not function without these settings being correct!
Selecting the Use External Browser Configuration for Internal Browser check box applies consistent file save behavior when viewing documents in either the internal browser or an external browser. See Configuring External Browsers for details.
By default, when you browse a document in the internal or external browser, it is opened from the local file system or returned via FTP from a remote server. That is adequate for checking page content and formatting, but for developing a Web site, you need to see dynamic pages as visitors to the site will actually experience them.
To do this, you can route the documents through a Web server. The server software can be on the local machine, a network server, or a remote system. So, instead of just opening the files, an HTTP request for the page is sent to the server. If any server-side processing is required, such as for scripts, the Web server will hand off the page to the appropriate server for further processing, then return it to the browser. This is valuable for previewing applications and site elements in a test environment before deploying the site.
You establish this routing by associating the physical directories where your files are stored with the server that processes the files. This association is called a mapping.
A wide range of Web servers is supported, so you can create multiple mappings and select a server to use for processing as needed. Consult your server documentation or Internet Service Provider (ISP) for the specifics of accessing server directories.
| To add a mapping: |
In this example, the IIS document root is used.
In this example, the default entry is used because the document is to be processed by the Web server on the same machine.
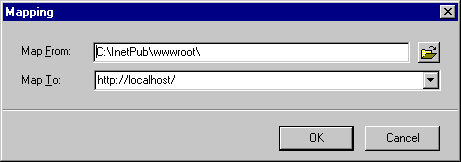
The mapping appears in the Settings pane.
If you want to process documents from a location other than below the Web server root, you need to identify the file path in the Web server. The following procedure is based on a typical IIS installation, the procedure for your installation might differ. If you are using a different Web server, consult your server documentation.
| To configure IIS for a server mapping: |
Be sure to include the full virtual directory path in the URL.
If you set up multiple mappings, you will need to switch to the appropriate mapping for the document you want to process.
| To set a mapping as the default: |
| Copyright © 2000, Allaire Corporation. All rights reserved. |
|